The holidays are over, which means holiday cooking is over.
Welcome 2012! Welcome back Making Groceries!
This week we’re going for a simple recipe with lots of savings: tortilla chips. One of the best parts of going out to eat Mexican is the little basket of fresh, warm chips they offer with salsa as a prelude. I have been known to down so many that I’ve had to package my whole meal into a to-go container when it finally arrived. Making them at home gives the same yummy freshness, and you can see why they’re offered as complimentary; they’re super easy to make and inexpensive too.
I’m offering two ways to make them: fried or baked, so you can choose which you prefer. I like the taste of the fried chips, but that does make them messier to make and richer in fat and calories. The baked chips taste fine, but they’re just not that exciting. I would use them in Tortilla Soup, rather than as a dipper.
Fried Tortilla Chips
5 white corn tortillas
1/2 inch of good frying oil (I like to use grapeseed. Canola is fine)
sea salt
1. Place tortillas into a stack. Cut the stack like a pie, into six wedges.
2. To make the most out of your oil, use a medium-szed sauce pan for frying. By having a smaller area to cover, you need less oil. The sauce pan also prevents most splatters from leaping onto your stove top, so clean up is easier. Add just a half an inch of oil and heat it over a medium-high flame. The oil is ready when it shimmers slightly.
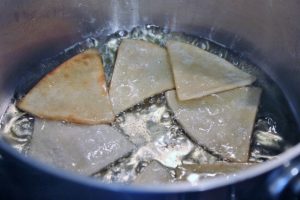
3. Place wedges into the oil in batches, so it’s not overcrowded. As soon as you see the edges turn brown, flip them over. Once they have a slight golden brown color and a firm texture they are done. They’ll take about a minute per batch, speeding up as the oil gets hotter.
4. Remove chips with tongs and place them on paper towels or a cooling rack placed over a cookie sheet to drain off excess oil. It’s important to salt them immediately and generously. Keep working until all the wedges are fried. They taste best warm, but can be eaten later.
Baked Tortilla Chips
5 white corn tortillas
1 T olive or grapeseed oil
sea salt
1. Preheat oven to 400°. Place tortillas into a stack. Cut the stack like a pie into six wedges.
2. Arrange wedges on a large baking sheet so that they do not overlap at all. Brush with oil and season generously with sea salt.
3. Bake for 8-10 minutes. Due to oven variances, start checking at 6 minutes. You are aiming for a golden color with a crisp texture. Enjoy!
Flavor Notes
If you want to spice things up, by all means go ahead. You can add spices when you add the salt in either recipe. If you want a hint of lime, add zest after baking or wth the salt in the fried version.
If you want to make a yummy salsa or guacamole, please check out my most downloaded-recipes for Coconut Crusted Tilapia with Miami Mango Salsa and Black Bean and Mango Quesadilla with Green Goddess Guacamole. I must say they are both strikingly delicious!
The Bottom Line
Chips have never been a regular part of my diet or grocery cart. Thank goodness! They are expensive. On the rare occasions when I do go to purchase them, I am always taken aback by their price tag. Depending on the brand, a smaller bag is about $4 or $5. These homemade versions are smaller in quantity, but the fried version rings in at 56¢ and the baked version is 35¢.
As far as taste is concerned, the fried can’t be beat, but the baked can. The fried version is fresh, warm and perfect. It’s so different than the processed bag version. The baked version is crisp and good for munchies, but it does taste like healthier fare. If I ate chips often, I would opt for it because of the health benefits. Because I eat chips only a few times a year, unless they are garnishing a soup or something else with a lot of flavor and liquid, I’ll opt for the fatty kind. It’s a treat and I’ll treat it like that.
As far as effort, the baked version requires almost none, just a bit of care to not let the chips touch. The fried version requires standing over the stove for about 10 minutes and cleaning up a greasy pot. It’s the price to pay for indulgence.
I’m glad to back to making groceries. You can count a new recipe every Friday. Please feel free to comment with requests. Happy New Year!


Leave a Reply